During 1917, Allied hopes of a decisive breakthrough on the Western Front were repeatedly raised, then dashed. The men of the New Zealand Expeditionary Force played an active part in these seesawing events.
Key dates - 1917
- 9 April–16 May: Battle of Arras
- 7–9 June: Battle of Messines
- 12 June: NZ Division pushes German outposts back to La Basseville
- 27–31 July: NZers capture, lose and recapture La Basseville
- 4 October: NZ attack on Gravenstafel Spur succeeds
- 12 October: NZ Division suffers devastating losses at Passchendaele
- 18 October: NZers relieved by Canadian troops
- 6 November: Canadians capture ruins of Passchendaele village
- 20 November: British high command ends Passchendaele offensive with objectives unachieved
- 3 December: NZ Division attacks Polderhoek
For the New Zealanders, as for the Allies generally, 1917 began with high expectations, optimism and determination. Belief that the Germans were beginning to buckle from the blows struck the previous year was reinforced when, in February, they suddenly pulled back some 40 km from the tortured Somme battlefield to a prepared position, the formidable Hindenburg Line. Most anticipated that further attacks by the Allies would bring them to their knees in 1917.
Instead, the year would bring frustration, depression and demoralisation. By its end, the Allied position seemed to have been undermined by dramatic events elsewhere. Wracked by revolution, Russia sued for peace, with dire consequences for the Western Allies, whose own offensives on the Western Front had failed to make any significant progress. Those fighting there knew they would soon face greatly reinforced German forces, as divisions were transferred from the now quiet Eastern Front.
New Zealanders shared the feelings of despair. During the year they were involved, in varying numbers, in all three major offensive efforts — at Arras, Messines and Passchendaele. The nadir of their fortunes came in October in the fighting at Passchendaele. The village near Ypres in Flanders has ever since been a byword for the horror of the Great War, conjuring images of soldiers floundering in a shattered landscape of mud, shell craters and barbed wire under pitiless machine-gun and artillery fire. The ridge leading to the village, Bellevue Spur, was the site of the worst disaster, in terms of lives lost, in New Zealand’s post-1840 history.
In the first major Allied offensive of the year, at Arras in April, several hundred New Zealanders played a valuable support role. These were the men of the New Zealand Tunnelling Company, who prepared underground facilities to assist the advance.
In the meantime II Anzac Corps, in which most of the New Zealanders in the theatre were serving, had moved north from Armentières into Belgium in February. Here it became involved in preparations for an attack on the Messines Ridge. This was an essential prelude to the main Allied attack, which became known as the Third Battle of Ypres, to break through the Germans holding the ridges surrounding Ypres. While the Messines attack succeeded completely, the main assault foundered in the face of determined enemy resistance, difficult terrain and appalling weather. Eventually all that was gained was a few kilometres of ground, including the ruins of Passchendaele, at horrendous cost in lives.
For the New Zealanders, Passchendaele did not end the misery of 1917. In December, at nearby Polderhoek (Poelzelhoek), they suffered another costly setback. By the time they were finally withdrawn from the Ypres salient front line in February 1918, the New Zealanders had suffered more than 18,000 casualties — including around 5000 deaths — and won three Victoria Crosses for bravery. In terms of lives lost, 1917 was the most costly of the NZEF’s three years on the Western Front.
Allied plans
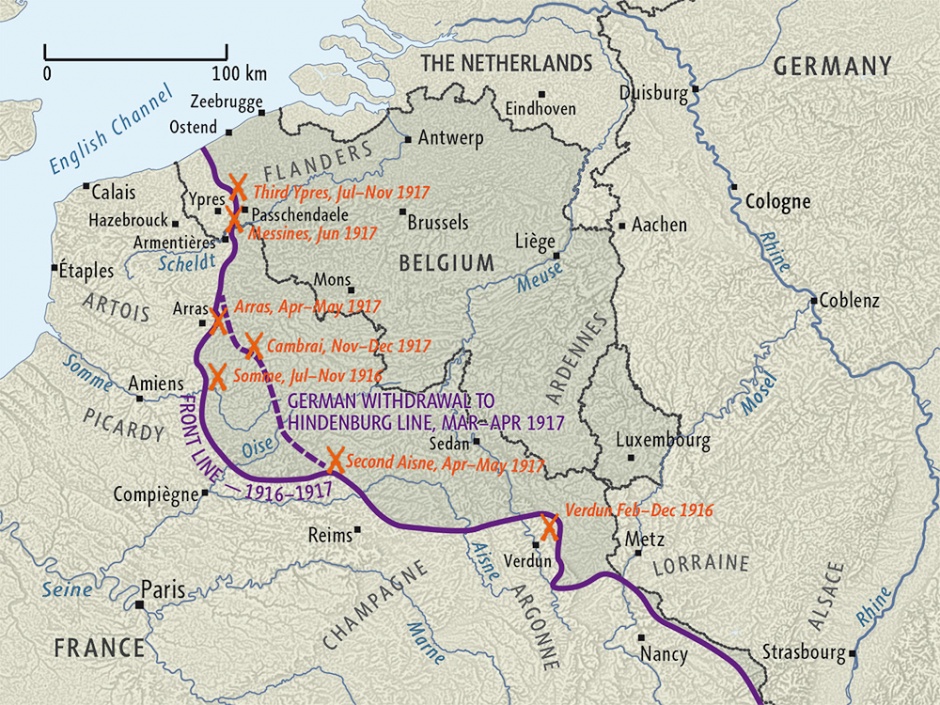
The Western Front 1916-17 (Geographx)
British and French leaders, meeting in December 1916 to discuss plans for the coming year, agreed to repeat the 1916 formula of coordinated attacks. Haig was keen to launch an offensive in the hitherto quiet Flanders sector, but alliance considerations intruded. Claiming that he could achieve a decisive victory, the new French commander, Robert Nivelle, gained approval for a spring assault in the Champagne area. Haig was obliged to conform to this plan by launching a diversionary attack in the Arras sector.
General Sir Edmund Allenby’s Third Army was tasked with making the main British attack, supported by the British armies on either side. That to the north, the First Army, would assault Vimy Ridge.
The attack, on 9 April, was a dramatic success. On the first day troops pushed forward more than 5 km. Canadian troops took Vimy Ridge. But as with preceding attacks, the initial momentum could not be sustained as German resistance stiffened.
While Allenby continued to press forward, Nivelle unleashed his much vaunted attack further south on 16 April. Four French armies smashed into the enemy lines, but the fighting soon degenerated into a slogging match with no hope of a breakthrough.
In the aftermath of this failure General Petain, the hero of Verdun, replaced Nivelle. His immediate task was to deal with a serious breakdown of discipline among his troops. The mutinous state of the French Army would lie like a dark cloud over Allied operations on the Western Front for the rest of the year.
Arras
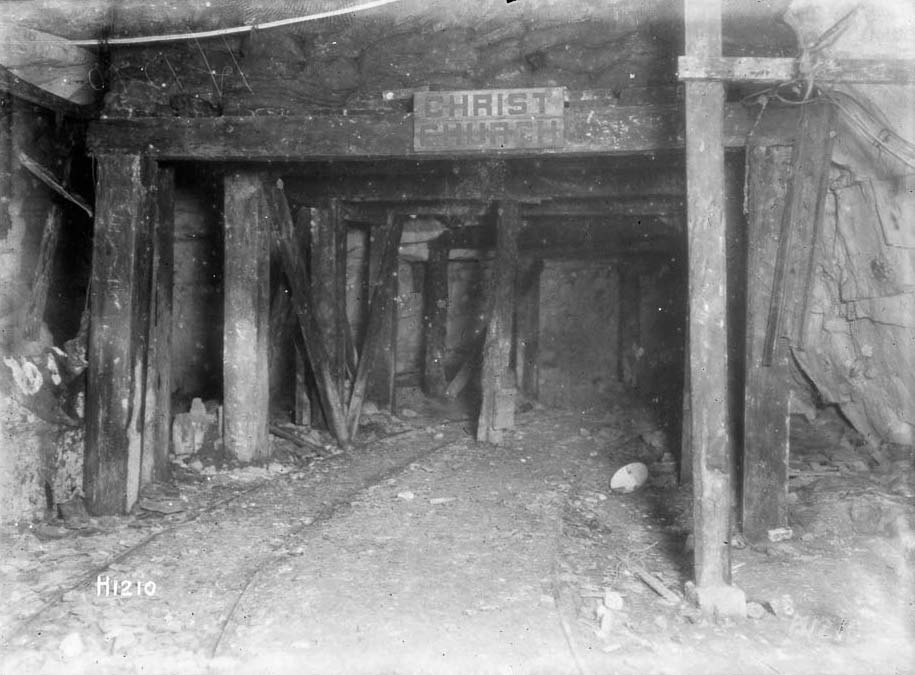
Christchurch cavern, Arras, 1917 (ATL, 1/2-013758-G)
New Zealanders took part in the Arras offensive. While some served as officers in British units involved, the New Zealand Tunnelling Company was also present. Although not participating in the main infantry attack of 9 April, it played a useful support role in preparing the way for part of the British assault force.
In the run-up to the offensive, the tunnellers’ task was to develop caverns under the city of Arras and to prepare tunnels through which assault troops could get close to enemy trenches before emerging to charge them. The caverns, dating from the 17th century, were linked up, their floors flattened and raised, and underground facilities for up to 18,000 troops developed. The New Zealanders, assisted by British tunnellers, connected a sewer (in the city’s former moat) to the cavern system. Hundreds of British and New Zealand infantrymen provided labour, and for a period 43 Māori pioneers were also committed to this work.
Plans to use the system in the 9 April attack were affected by the German withdrawal to the Hindenburg Line. The southern workings were left too far from the new German front line to be utilised for offensive purposes, though they did provide a secure means of access to the front area. One of the 14 divisions involved in the attack was able to use some of the northern tunnels to attack enemy trenches, but the speed of the advance soon left the tunnel exits well behind.
Ypres offensive
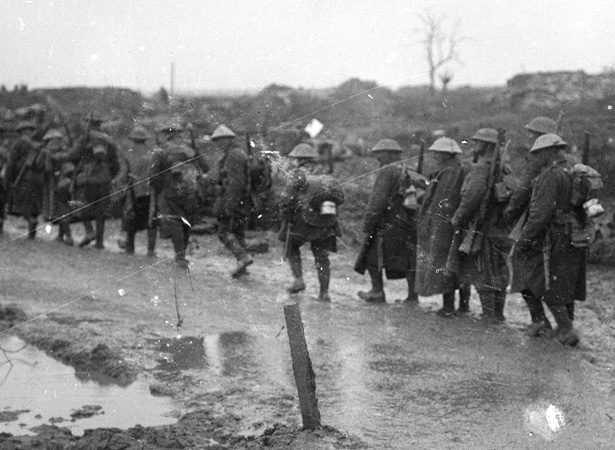
New Zealand troops training for Messines (ATL, PA-f-093-05-4)
With the failure of the Nivelle offensive, Haig was able to refocus on his plans at Ypres. He envisaged breaking though the German lines on the higher ground surrounding the town, essentially the Pilkem Ridge and the Geluveld–Passchendaele Plateau, before driving forward to the important transport hub of Roulers, 8 km from Passchendaele, and then rolling up the enemy defences along the Belgian coast. By this time the German campaign of unrestricted submarine warfare — which ultimately helped seal Germany’s fate by bringing the United States into the war — was causing concern in London as U-boats wreaked havoc and shipping losses mounted. The prospect of neutralising the German submarine facilities on the Belgian coast therefore had considerable appeal. Although troubled by the prospect of another heavy butcher’s bill, British leaders gave Haig a conditional go-ahead.
Before this offensive could be launched, however, one important preliminary step was required — the removal of the Germans from the Messines Ridge to the south. Until this was done, the enemy would be able to both observe preparations for the main blow and present an ongoing threat to the British flank. This task was entrusted to General Sir Herbert Plumer’s Second Army, which included II Anzac Corps. A substantial number of New Zealanders would inevitably be involved.
Capture of Messines Ridge
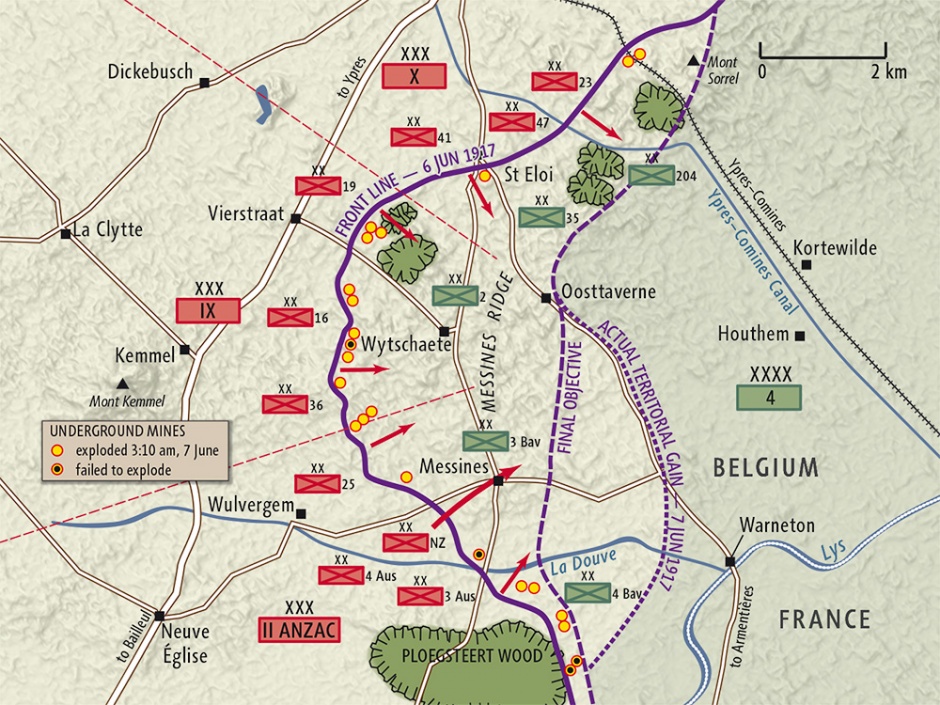
Battle of Messines, 1917 (Geographx)
The plan for the assault on Messines Ridge provided for three corps to advance, each with three divisions in the front line and one in reserve, on a 16-km front. Lieutenant-General Godley’s II Anzac Corps would be the southernmost, facing Messines. Godley ensured that the objective of the New Zealand Division, in the centre of his corps’ front and flanked by a British and an Australian division, would be the ruins of the village.
Beyond the Div
While most New Zealanders fought on the Western Front with the New Zealand Division, a significant number belonged to non-divisional units. II Anzac Corps’ mounted troops included a squadron of Otago Mounted Rifles and New Zealand cyclists of the Anzac Cyclist Battalion. At Messines, the cyclists helped build a track across no-man’s land, while the Otago mounteds scouted enemy positions on horseback. Barbed wire and heavy fire forced them to dismount 800 m into enemy territory but they were still able to pass back useful information on the German defences.
During the preceding two years, tunnellers had been toiling away, running shafts under the German front line. These would now be utilised to explode huge mines under the enemy positions at the beginning of the attack. Some New Zealand infantrymen were attached to British and Australian tunnelling units in early 1917 to help complete this work. In all 22 mines were readied (in the event, 19 exploded). None were on the New Zealand Division’s front.
Meanwhile extensive preparations were made for the attack. Messines would be arguably the best-prepared attack made by the British Expeditionary Force on the Western Front. Jumping-off trenches were dug at night, transport facilities were developed and material was stockpiled. Infantrymen practised the assault behind the lines on ground similar to that they would traverse. All the while the gunners battered the enemy front line, as well as searching for and neutralising German artillery batteries. They also prepared a creeping barrage for the assault that was far more sophisticated than that used on the Somme in 1916.
The attack was a striking success. Heralded by the awe-inspiring thunder of the mine explosions, the men of nine divisions set off forward at 3.10 a.m. on 7 June 1917. In the New Zealanders’ sector, as in the others, there was little immediate enemy artillery fire, so well had the artillery suppression plan worked. The leading elements were across no-man’s-land before the German gunners began to respond.
The New Zealand units in the vanguard, two battalions each of 2nd and 3rd (Rifle) Brigades, were soon in the ruins of Messines, mopping up dazed and demoralised Germans. With everything going to schedule, the New Zealanders had cleared Messines of the enemy by 7 a.m. Rifles NCO Samuel Frickleton won a Victoria Cross for his exploits during this fighting.
The next stage of the plan, to push forward 1.5 km on the far slope of the ridge, was put smoothly into operation. 1st Brigade moved through the troops on the ridge to take up the advance to the next objective — the black line on the assault map, which defined the limit of the New Zealand Division’s advance. A German counter-attack in the early afternoon was repulsed. Australian troops of the corps’ reserve division then leapfrogged through to secure the final objective (the Oosttaverne Line) 1.5 km beyond the crest, though only after some hard fighting as German resistance stiffened.
The capture of Messines was achieved with relatively few casualties, not least because of the disruption of German artillery fire in the early stages. As the day wore on, however, the recovering German gunners began to fire on the newly captured areas with increasing ferocity. Retained on the ridge in large numbers to repel an expected major enemy counter-attack which never eventuated, the assault troops endured a trying and costly bombardment. By the time the New Zealand Division was relieved on 9 June, it had suffered 3700 casualties, including 700 dead.
Third Battle of Ypres
Leslie Andrew won a VC at La Basseville (ATL, 1/2-031680-F)
The Third Battle of Ypres, as General Haig’s offensive was called, began on 31 July 1917. Rather than allowing Plumer to exploit the Messines success by attacking the Geluveld Plateau immediately, Haig had given General Gough, commander of the Fifth Army, responsibility for making the main attack, with Plumer relegated to a supporting role. More then seven weeks had elapsed by the time Gough launched his assault, allowing the Germans to bolster their defences in the threatened areas.
Gough’s task was to break through. Insisting on distant objectives, Haig had developed a sophisticated plan which involved General Rawlinson’s Fourth Army landing a division behind the enemy lines (Operation Hush) to link up with Gough’s forces coming from Roulers. A New Zealand field artillery unit, 2nd (Army) Brigade, was deployed to the coastal sector as part of this plan, which in the event never came close to being implemented. The gunners found themselves part of a prolonged and fierce artillery duel across the Yser River.
Other New Zealanders were also in action in support of Gough’s offensive. Plumer had been ordered to threaten Lille as a diversion. As part of the Second Army’s effort in this direction, Russell’s division assaulted the village of La Basseville, near the Lys River. The village was taken, lost, then retaken on 31 July. In this fighting Leslie Andrew won a Victoria Cross.
Meanwhile Gough’s army had taken the Pilkem Ridge with relative ease. But the firm German hold on the Geluveld Plateau soon hindered further progress. As heavy rain turned the battlefield into a morass, Gough’s infantrymen struggled to advance in a series of attacks.
Drive on Passchendaele
Battles of Broodseinde and Passchendaele, 1917 (Geographx)
With visions of a strategic breakthrough fading fast, Haig shifted tack and turned back to General Plumer. The Second Army would attack the Geluveld–Passchendaele Plateau, more than two months after Plumer’s initial plan to do so. Rather than seeking an immediate breakthrough, Plumer resorted to the bite and hold tactic that had been so successful at Messines. If the advance was confined to a limited portion of enemy territory within range of artillery support, enemy counter-attacks could be broken up by gunfire as the assaulting infantry dug in on their objectives. Plumer – and Haig – believed that a series of limited hammer blows would throw the enemy into confusion and open the way for a breakthrough.
The first bite of a projected five-stage attack was launched on 20 September — an operation in which Brigadier-General Bernard Freyberg’s British brigade was involved (though he was wounded the day before). It succeeded admirably, as did the second bite on 26 September, causing much anxiety among the German defenders, who scrambled to develop a response to Plumer’s tactic. Their reliance on immediate and well-organised counter-attacks to dislodge attacking troops from their gains had been proved to be disastrous in the face of effective artillery support.
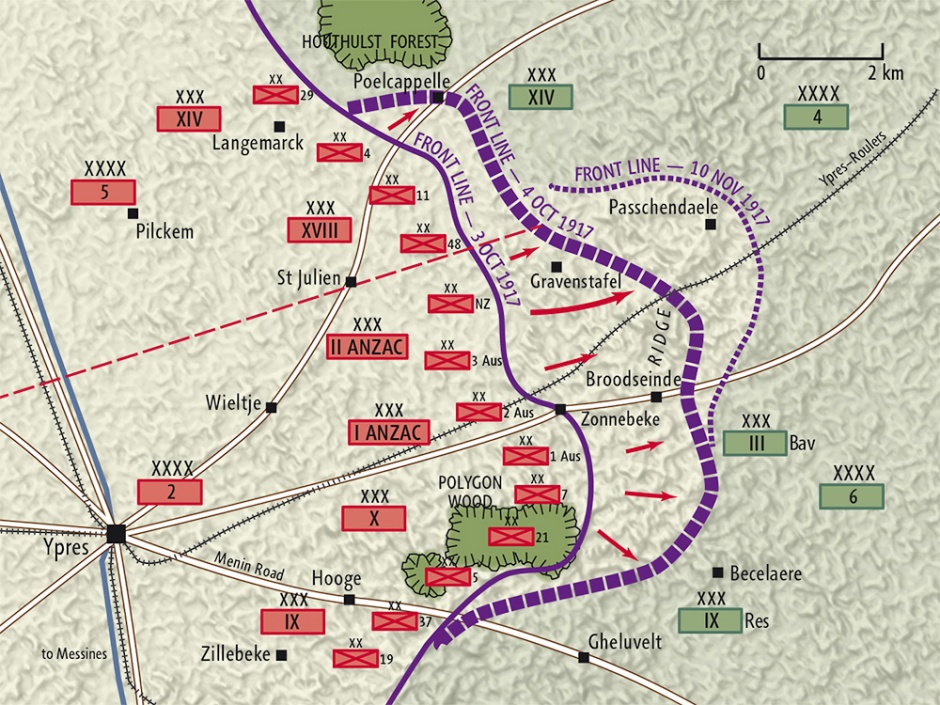
The next bite was scheduled for 4 October amid rising optimism at GHQ that a way through had at last been found. Among the forces that moved forward to make this next attack were both Birdwood’s I Anzac Corps and Godley’s II Anzac Corps. For the first and only time, the two Anzac corps would attack alongside each other.
Gravenstafel Spur
Shattered remains of Remus Wood, 5 October 1917 (ATL, PAColl-1547-04-1/217)
The New Zealand Division made its first attack on 4 October 1917. Its role was to cover an Australian assault on the Broodseinde Ridge to the south. The New Zealanders’ objective was Gravenstafel Spur, the first of two spurs from the main ridge at Passchendaele (the other was Bellevue Spur). Once again artillery played a big part in the success of the attack, which was made by Brigadier-General Charles Melvill’s 1st Brigade and Brigadier-General Herbert Hart’s 4th Brigade, the latter’s only major action.
Dave Gallaher and the All Blacks
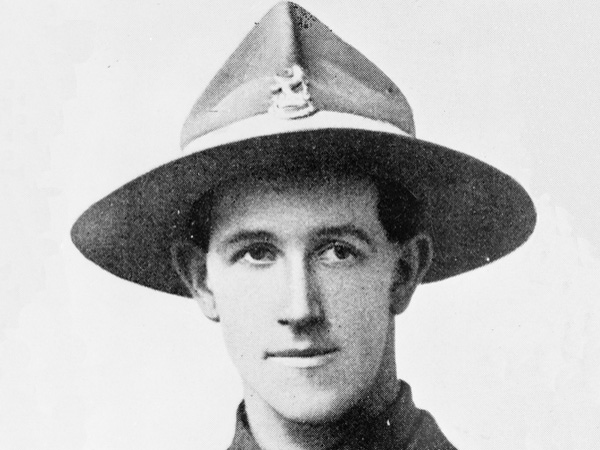
Thirteen former All Black rugby players were killed in the First World War – 1 in 10 of those who had worn the black jersey during the previous decade. The most famous was Sergeant Dave Gallaher, captain of the All Black Originals from 1905 to 1906. Mortally wounded during the attack at Gravenstafel Spur on 4 October 1917, 43-year-old Gallaher died a few hours later and was buried at Nine Elms Cemetery, Poperinge. Read more.
The bombardment, which began at 6 a.m., caught many Germans in the front lines, the result of a desperate change of approach designed to combat the bite and hold tactic. With the counter-attack response unavailing, the Germans had decided to try to stop any new attack at the outset. Whereas previously the front-line trenches had been occupied by minimal forces, men were now packed into them. The result was heavy casualties. Many New Zealanders believed, incorrectly, that the presence of so many enemy dead in the forward position was a sign that they had pre-empted a German attack.
Although the going was difficult — ‘The mud is a worse enemy than the German’, divisional commander Sir Andrew Russell complained — the New Zealand troops advanced 1000 m to secure the spur and consolidate their position. More than 1000 prisoners were taken, but the attack was costly. Among the New Zealand Division’s 1600 casualties, some 500 men had been killed or mortally wounded.
The great success of 4 October led to a fatal miscalculation by the British high command. Mistakenly concluding that enemy resistance was faltering, and aware that the Germans had little in the way of prepared positions behind Passchendaele, Haig now looked to deliver the long anticipated knockout blow. He ordered his cavalry to move up ready to exploit the expected breakthrough in the next planned attack, which he wanted to bring forward by two days, but settled for one. British and Australian troops would make this attack on 9 October.
In rapidly deteriorating conditions, adherence to the five-stage timetable was a recipe for disaster. On II Anzac Corps’ front, the attacking forces, the British 49th and 66th Divisions, struggled to get into position. Artillery preparations were hindered by problems in getting guns forward. The gunners failed to open the way, especially by cutting the enemy barbed wire. In the face of strong German resistance, the attack collapsed with heavy casualties.
The blackest day
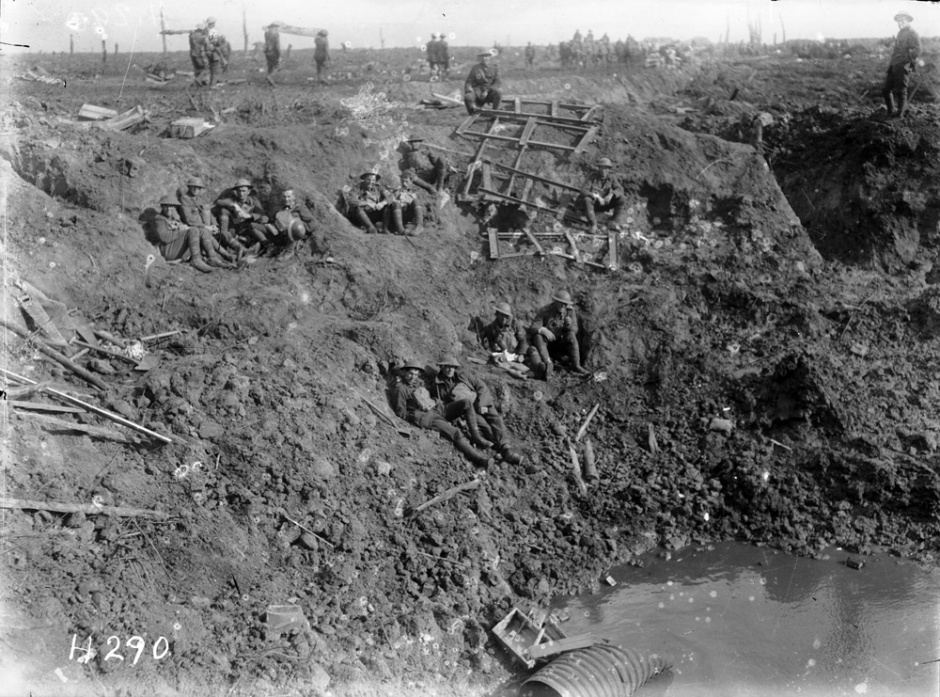
New Zealand engineers at Spree Farm, 12 October 1917 (ATL, 1/2-012935-G)
With the failure of the 9 October attack, Haig’s hopes now rested with the last of the five planned hammer blows three days later. Far from calling off the attack, or delaying it to allow adequate preparation, he hoped it could achieve what the previous effort had not — the final dislocation of the enemy defences, which he believed were tottering, despite the 9 October failure. With little time available, the hapless troops made ready for this next effort.
One family’s sacrifice
Many New Zealand families suffered multiple tragedies at Passchendaele. The 1176 New Zealanders named on the Memorial to the Missing at Tyne Cot Cemetery in Belgium include at least five sets of brothers. For one family, the Newloves of Takaka in Nelson, the sacrifice at Passchendaele was greater still – brothers Charles (aged 41), Edwin (32) and Leslie (22) were all killed in the New Zealand Division's attacks of 4 and 12 October 1917. Read more.
As on 9 October, the attack would involve two armies — with 13 divisions in six corps advancing. On Godley’s II Anzac Corps’ front, the attack would be made by the same two divisions that had succeeded so admirably on 4 October, the New Zealand Division and Major-General John Monash’s 4th Australian Division. The Australians would take Passchendaele while the New Zealanders supported them on the left by taking Bellevue Spur.
Because of the lack of time and the quagmire, preparations for this attack were no more satisfactory than those for the 9 October attack. Batteries were not completely in position; those that got forward were set up in mud; ammunition remained limited. No systematic bombardment of the barbed wire or the pillboxes had been undertaken. Nor were the gunners able to deliver an effective creeping barrage when zero hour arrived, at 5.25 a.m. Although opening with an impressive roar, this soon became ragged or petered out. Worse, many of the shells at first fell among the waiting infantry.
After enduring a searing few minutes of shelling from their own side, the infantrymen moved off in drizzle that soon turned to driving rain. On the left, 3rd (Rifle) Brigade pushed on till halted by machine-gun fire. On the right, 2nd Brigade rapidly came up against barbed wire that sloped obliquely across the New Zealand front. A few determined individuals got through the barrier, but they were quickly killed. Most of the rest were forced to take cover in shellholes. Only on the extreme right was there any progress, with several pillboxes captured. Germans on the spur ahead enfiladed not only 3rd Brigade to the left but also Monash’s Australians on the right, effectively preventing progress in either sector.
Orders came for another push at 3 p.m., but this was mercifully cancelled at the last moment. The troops eventually fell back to positions close to their start line. For badly wounded soldiers lying in the mud, the aftermath of the battle was a private hell; many died before they could be rescued. Extensive efforts were made to get them out in the next two days, assisted by an informal truce that developed as Germans refrained from firing on stretcher parties.
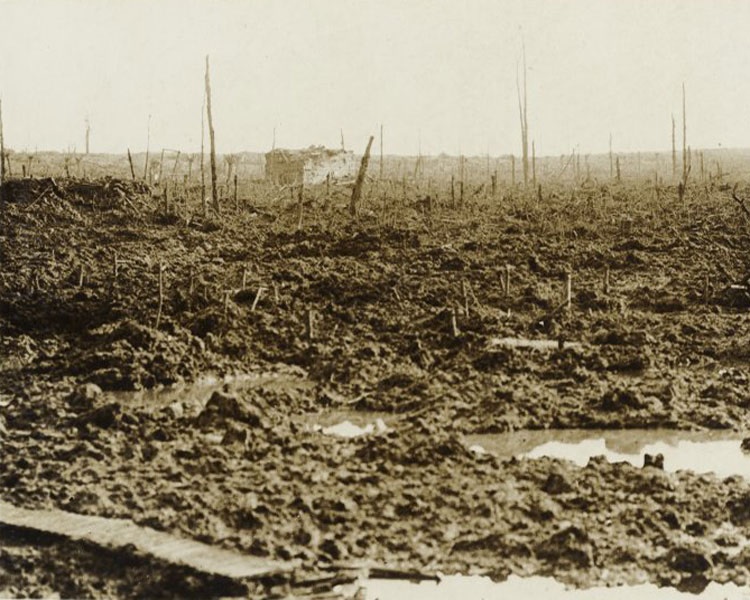
The toll was horrendous. There were about 2700 New Zealand casualties. They included about 950 men who were either dead or mortally wounded; 843 men are officially listed as dying on 12 October, and the rest succumbed to their wounds in field ambulances and hospitals behind the lines in Belgium, France and the UK, some many weeks later. While some of the 843 killed in action may have died on 13 or 14 October — it was impossible to know exactly when wounded men lying between the lines may have died — 12 October is undoubtedly, in terms of lives lost in a single day, the blackest day in New Zealand’s post-1840 existence.
The battle ends
On 18 October, the Canadian Corps relieved II Anzac Corps, though the New Zealand infantry remained in the line for another week. Now accepting the need for delay, Haig was nevertheless determined to persist. Passchendaele would be taken. With the benefit of hindsight, his decision to continue the offensive seems difficult to understand. Strategic gains were no longer possible and the capture of Passchendaele would only create a difficult salient (though the higher ground would be useful as a winter line).
In a series of well-prepared attacks in atrocious conditions, Canadian troops finally occupied the ruins of Passchendaele village on 6 November, at the tragic cost of 12,000 casualties. New Zealand gunners supported the Canadians in their first two attacks.
With winter approaching, Haig closed down the battle on 20 November. The offensive had failed. In 3½ months of fighting, and at horrendous cost, the enemy had been pushed back about 8 km, but only part of the ridge had been taken. An attempt in December to win more ground ended in yet another disaster. Within months all the territory gained would be back in German hands.
After Passchendaele
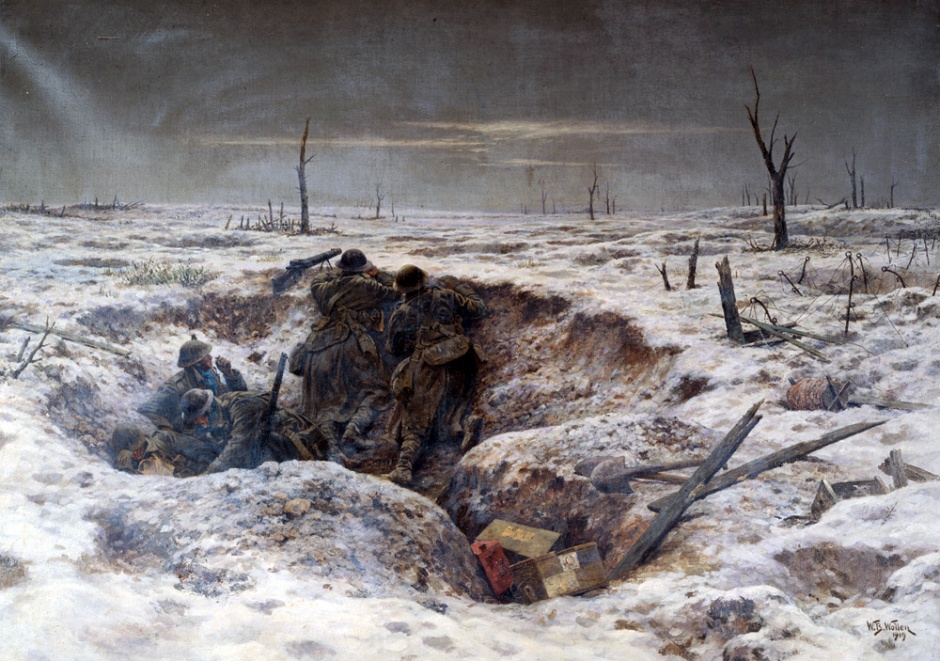
William Barnes Wollen, Observation post, Winter, 1919 (ANZ, AAAC 898 NCWA 493)
Withdrawn from the Passchendaele sector on 24 October, after a week under Canadian command, the survivors of the New Zealand Division had a three-week respite before re-entering the line. Their mood was dark. Men grieved for mates lost in the attacks, pondered the reasons for the 12 October failure amid rumours about responsibility, and were saddened by the futility of the attacks.
Even more depressing was awareness that the tide seemed to have turned against the Allies. If there was an end in sight, it was one that seemed to favour the enemy, whose eastern successes against Russia had tipped the balance in their favour for the immediate future. Would the Germans try to win on the Western Front before the Americans could make their presence felt there?
The troops’ faltering morale was severely tested when, in mid-November, they moved into the Polygon Wood sector, just south of Passchendaele. In contrast to their brief appearances on the battlefield, they faced a prolonged stint in a mangled landscape, waterlogged, filled with the detritus of war – including dead mules – and undeveloped as a trench system. Holding the line in this sector for the next three winter months would be a trying experience. Another failed attack, at Polderhoek in December 1917, added to their misery.
Polderhoek
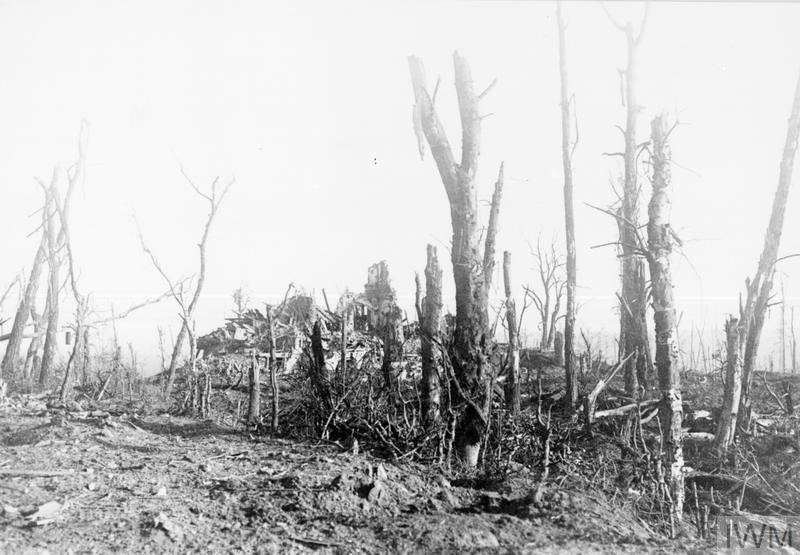
Ruins of Polderhoek Chateau, 1917 (IWM, Q 42251)
The New Zealand attack at Polderhoek was a response to the awkward configuration of the line in the Polygon sector, which allowed Germans on Polderhoek Spur to the south to enfilade New Zealand positions. Capture of the spur was important for defensive reasons, but it was no easy task. The immediate objective was the ruins of Polderhoek Chateau, in which the Germans had numerous strongpoints, and nearby pillboxes, a strong position that had resisted repeated British attacks in previous weeks. Because the chateau was separated from the New Zealand lines by a creek that was a quagmire, the attacking New Zealand troops had to take over a section of the neighbouring corps’ sector for the operation.
At noon on 3 December men of the 1st Canterbury and 1st Otago battalions clambered out of support trenches about 180 m from the chateau. Hopes of surprising the enemy by dispensing with the usual preliminary bombardment were quickly dashed. But unlike at Passchendaele, the supporting artillery put down an effective creeping barrage and there was no barbed-wire obstacle for the attacking troops.
Behind the curtain of shells the New Zealanders pressed forward. They overcame a number of enemy strongpoints, but intense machine-gun fire eventually forced them to go to ground. The line had been pushed forward slightly, but the chateau remained out of reach. About 80 soldiers lost their lives, and hundreds were wounded. The New Zealanders’ mood was not improved when the British troops to whom the sector had been returned were driven back by a German counter-attack nine days later. Their only consolation was the Victoria Cross awarded to Private Henry Nicholas for his exemplary conduct during the assault.
Further information
This web feature was written by Ian McGibbon and Gareth Phipps and produced by the NZHistory team. It was published in 2017.
Links
- Counting the cost of Passchendaele (WW100)
- National Army Museum recollect
- New Zealand First World War histories (NZETC)
- Ngā Tapuwae: New Zealand First World War Trails (WW100)
- Online Cenotaph (Auckland War Memorial Museum)
- Western Front, 1916 to 1917 (Te Ara)
- WW100: New Zealand's First World War Centenary 2014-2019
Books
- Nicholas Boyack & Jane Tolerton, In the shadow of war: New Zealand soldiers talk about World War One and their lives, Penguin, Auckland, 1990
- Damien Fenton, New Zealand and the First World War 1914-1919, Penguin, 2014
- Glyn Harper, Dark journey: three key New Zealand battles of the Western Front, HarperCollins, 2007
- Glyn Harper, Massacre at Passchendaele, HarperCollins, 2000
- Andrew Macdonald, Passchendaele: The Anatomy of a Tragedy, HarperCollins, 2013
- Ian McGibbon (ed.), The Oxford companion to New Zealand military history, Oxford University Press, 2000
- Ian McGibbon, New Zealand's Western Front Campaign, Bateman, 2016
- Hugh Stewart, New Zealand Division, 1916–1919: a popular history based on official records, Whitcombe & Tombs, 1921
- Matthew Wright, Western Front: The New Zealand Division 1916-18, Intruder Books, 2015
Community contributions